
Step one... turn on some Miles, Bitches Brew....

This is another gem that I cut, inspired by the Herkimer Diamond.
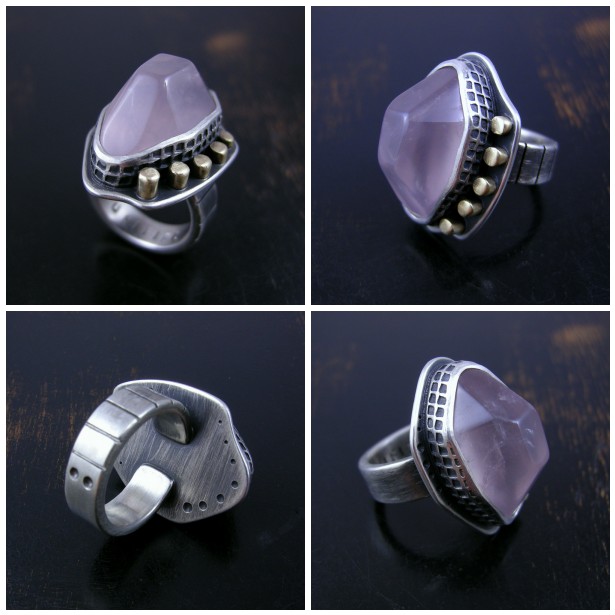
Rose Quartz, cut from a big hunk of rough, with a soft pink hue.
Here are all of the materials I that I used for this build.

I started by soldering some fine silver mesh to the bezel.

All soldered up and ready to form the bezel wall.

Here I am soldering the bezel wall seam.
I chose to put the solder on the inside of the wall as not to disturb the mesh pattern.

All soldered up!

Time to solder the base. I like to put my solder on the inside and pull it out for a nice smooth seam.

I drew a line on the bezel so I know the max height for my brass posts.

Preparing to solder the posts. I do this by smooshing little pieces of solder wire so they are paper thin. Just sit the posts on the solder and no mess!

The solder is hidden under the posts.

Once soldered, time to draw out the shape and get to sawing...

All cut out...

Shank is tapered by hammering, then sanded and stamped.

Shaping the shank with the Swiss super shank shaper, for sure!

Shank shaped and a seat has been filed.

Getting ready to get my shank on...
I like to wedge my solder on the outside connection and concentrate the heat inside the shank. This pulls the solder in and creates a nice smooth seam.

Here I drew a line to let me know how far and where to grind the bezel down.

Bezel wall has been shaped here...

Oxidized with LOS.

Finish is complete for the most part. Time to set and final polish some highlights!

And there she is... in all her glory!
I'm diggin it :)
LOVE the ring and its really interesting to see how you approached making it. (and now I really need a super shank shaper!!) X
ReplyDeleteI love it too! And thanks for the tutorial! I learn something every time.
ReplyDeleteWhat a gorgeous ring! Love it! Nice to see your process of creating it!
ReplyDeleteThanks everyone! I am glad you enjoyed the photos!
ReplyDeleteNikki, it is a handy tool. It gets a nice shape. I do have to use the mandrel a bit, but that is because I taper my shanks. I use it every day though. Takes a little getting used to.
Just beautiful!
ReplyDeleteThanks for sharing your step by step process! Love the ring it's gorgeous!
ReplyDeleteI love the process shots, it is super informative! Beautiful!
ReplyDelete'She' is glorious indeed ! Fascinating to see the construction process, work of art!
ReplyDeleteThanks everyone for the wonderful comments!
ReplyDeleteThis is a gorgeous ring! It's so cool to get to see how you made it. Thanks for posting this. BTW, your photography skills are awesome too.
ReplyDeleteAwesome ring! and I need a super shank shaper as well, never seen it before and all this time my right arm is looking like Hulk's from forming rings.
ReplyDeleteThanks Karen!!!
ReplyDeleteNatalia, don't be fooled! You will just end up with bigger wrist muscles! Although on thinner shanks it is like butter :) heavy shanks can be painful sometimes.
Gorgeous. Loved to see how she came about. And just like Nikki now I need a Swiss super shank shaper :o)
ReplyDeleteYour work ROCKS! I love, LOVE your stuff. Gotta get me one soon. :oD
ReplyDeleteI'm not a silversmith but I LOVED this post. I think artists hesitate to share their process for fear of demystifying the final work, but this post of yours achieves the opposite - it brings me closer to the piece, the ring, your art. Awesome and thank you!
ReplyDeleteThanks so much! It's been so long since I've updated! Glad to see that people are still finding interest in my posts! Cool!
ReplyDeleteThanks so much for this post - I'm new to the torch and am greatly appreciative of how you shared your process and especially the tips on solder placement for a cleaner finish.
ReplyDeleteI found you through an FB post mentioning a comment here that sadly, didn't include a link back, :^( But Google to the rescue! Thank goodness for the bots and spiders. :^)
Thanks again!
Thanks Perri! I'm glad you found this useful! And very cool that you were able to find it through google! Awesome!
ReplyDeleteYour work is gorgeous, and you make me want to learn some lapidary skills... do you cut all your own stones? esp. the Prehnite which is so beautiful
ReplyDeletebut the whole reason behind my comment today is that i need to know where you got the shank shaper. I have never seen one before and that would be an amazing tool to have.
Jessica
Hey Jessica thanks!
ReplyDeleteI did cut this stone, but it really depends on what I am going after. I find that if it is just a basic color/cut, it's just not worth my time to cut it, so I buy.
If you go on rio grande's site and search for "wire shaping plyers" you will see them. They also sell an economy set. I really don't remember paying that much for the swiss set. I think they went up in price for some reason?